
Here is my first follow-up on my tipi post. As I said in that first post, I decided to make a traditional tipi cover, based on instructions in the book "The Indian Tipi", but replace the traditional 17 wooden pole system with a single aluminum center pole to carry the weight of the tipi cover, and 1" nylon webbing serving as guy wires and "poles" for the tipi cover. In the spirit of being pack-able in a car, the pole is made of 2' sections, each having an additional 6" taper for slipping them together. In the photos below, you can see the black webbing "poles" and the sectioned 16' aluminum sch 40 pole.


The above views are looking up through the smoke flaps, which allow venting of smoke from a fire inside the tipi. We did try an open fire inside, but it was unfortunately smokey, and we were worried about CO poisoning. We now have a battery-powered CO detector. That also puts a portable wood-burning stove, preferably rocket-mass-heater style, onto our list of things to explore.


The other thing you may notice is that the smoke flaps allow rain to fall into the tipi. The smoke flaps can be manipulated at angles that will block most of the rain. However, the center, where the pole goes through, is not protected. For that, I made a "hat" with a "crown" of dowels that both keep the hat open in a cone shape, and give the aesthetic hinting at real tipi poles extending above the tipi.

Above is the canvas pattern for the tipi hat. I need to look again at the one I made, and write some instructions on how to sew it. I used a Pfaff sewing machine, because it is capable of sewing through 4-5 layers of canvas. Below is a CAD screenshot of my custom-designed, 3d printed parts for assembling the hat and webbing "poles" to the top of the 16' aluminum pole. The parts are available for download at Thingiverse.


The webbing goes through the green "pole cap", which has a conical shape. I plan to rework this part, because the straps end up cracking the vertical features. There are five straps in all, creating ten "poles". The "cone" sits on the top of the rain hat. The "plug" is underneath, and the two are bolted together, sandwiching the canvas in between. The "cone" holds the dowels, which go into pockets in the canvas.


Below is a view inside the rain hat, showing three bungees feeding through the canvas around the "plug". They stretch down and hook into the holes in the part labeled "pipe", and hold the rain hat in place. In the above photo, you can see the knotted end of the bungee, as it feeds through the cone.

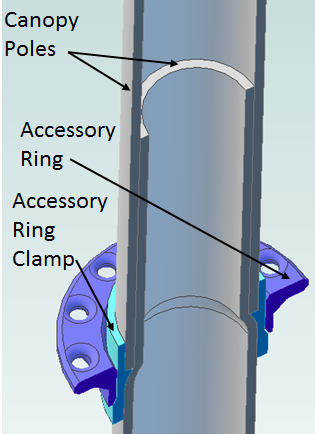
I made an "accessory ring" that locks into the groove where the aluminum poles join. It is useful for hanging things from. The ring clamp is in two sections, and locks in place when the accessory ring slides over the top of them.
Hello, I have made a tipi frame in my yard from long tree branches, and now I have the impossible task of sewing a cover for this tipi. I can't figure out how to measure it, etc. The branches connect at 9 feet in the air (height 9') and floor diameter is 19.5' (radius is 9.7'). This is a short, wide tipi for the kids. I put a center pole in to carry the weight and help the tipi be more sturdy.
ReplyDeleteAny ideas as to how I can create this? Traditional tipi design says to make a semicircle, but with a tipi this wide, it would look more like a full circle with a wedge cut out, I think. Help!!!
Hmm, you're going about it kinda backwards. The diameter is about the same as mine, but mine has a 16' center pole! It's really best to make a semicircle cover. Do you need to make it that large? Did you notice that your perimeter radius is larger than your tipi height? There will be a lot of sewing involved, unless you use something like a huge sheet of Tyvek. This is a great book for tipi info: http://tinyurl.com/nrkbgyw
DeleteIf you're really determined to stay on your course, here's how you size it. Calculate the radius of the cover by solving for the hypotenuse of a right triangle with sides = 9' and 9.75'. I get 13.26'. Then, you need enough of a circle to make the perimeter match the perimeter of the footprint, which is 2*pi*r = 61.26'. The perimeter for 13.26' = 83.37. So do the ratios: 6.26 ft * (360 deg / 83.37 ft) = 264.5 deg. If I did all that right, you need a cover with radius = 13.26' with a 95.5 deg wedge cut out.
Oops, typo, should have been: 61.26 ft * (360 deg / 83.37 ft) = 264.5 deg
DeleteA s an owner of a original designed tipi I find your design not only interesting but a wonderful idea for the weekend camper. As you know it is not easy to haul one of these around. I have a 38 foot trailer to haul mine so you just don't pack up and move on a moments notice. While I don't have any comments to assist with your design problem I certainly see the value in what you are developing and wish you great success.
ReplyDeleteA s an owner of a original designed tipi I find your design not only interesting but a wonderful idea for the weekend camper. As you know it is not easy to haul one of these around. I have a 38 foot trailer to haul mine so you just don't pack up and move on a moments notice. While I don't have any comments to assist with your design problem I certainly see the value in what you are developing and wish you great success.
ReplyDeletethis is an excellent example of maintaining a traditional utility while incorporating modern tech to improve mobility. I was wondering if you had considered adding a simple water catchment channel on the lower third of the tipi that would still utilize some gravity feed to your containment system?
ReplyDelete