
Use the knob to rotate the arm to an angle. Read the value on the Sine and Cosine scales. Sine and Cosine values are given for a circle with a radius of 1, which is also called a "unit" circle. To obtain lengths for a circle with a radius other than one, multiply the reading from the machine by the desired radius.

Sine and cosine are trigonometric functions of an angle, defined by using right triangles. In the animation above and the figure below, a right triangle has been drawn on top of the Harmonic Transformer. The angle below is set to 30°. The hypotenuse is the radius of the circle, shown as a green line. The hypotenuse/radius is drawn from the arm's pivot center to the center of the knob, where the yoke pin is. The blue horizontal line is the "adjacent" side of the triangle, and the magenta vertical line is the "opposite" side. Notice that the blue side is the same length as the reading on the cosine scale. Similarly, the magenta side is the same length as the reading on the sine scale.

Step 1
Print and clean up the five model files, shown below. These are sized to fit the print volume of the MAKERBOT® REPLICATOR 2®: 11.2L x 6.1W x 6H. The dome is optional, but adds character and protects the "key" nut. Note that the files with "-raft" in the name need to be printed with a support raft. The other model files do not require a raft.


Step 3

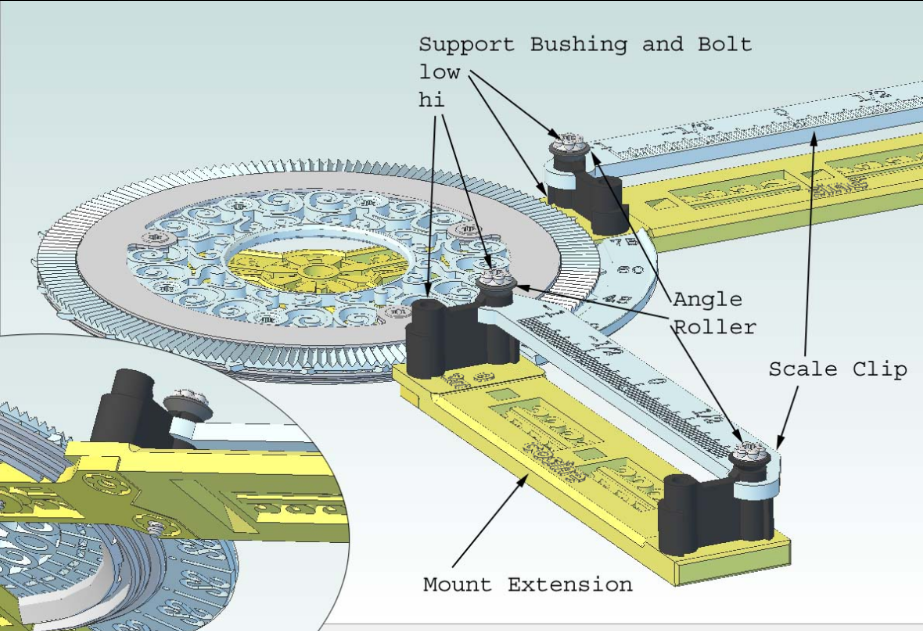
Step 4

Carefully turn the assembly over, and slip the Bezel sections under the Bezel Ring. The Bezel Ring will lock into the groove in the Bezel segments. Tighten all three screws until snug.
Step 5
Step 6

Push the Arm Pin all the way into the Arm. Push the Arm Bushing onto the part of the Arm Pin that extends through the bottom. The Arm Bushing should contact the bottom of the Arm.
Step 7


Step 8


Step 9

Step 10


Align the Dome notches with the assembly, slip it into the Dome Capture Ring, and rotate it clockwise until it stops. I found it helpful to line up the screw holes first, then look at the notch that lets it fit over the support base/mount extension frame. Then clock it to the other edge of that notch, carefully push the dome edge into the slot, and clock it back until the holes line up again. I found it to be tricky, and might try wetting the edge lightly with water next time, to slightly lube it. Insert the Dome Screw to secure the dome in place.
All Done! Now start reading the sines and cosines of those angles!
It looks like they wanted something a bit more simple to assemble and use. I love the device, though. I wonder if there is a good way to get the device out to schools, anyways. Via thingiverse? Or do you have to contact schools directly?
ReplyDeleteAnyone can download the models from Thingiverse, it just takes a 3d printer and some patience to make one. I would not recommend this as your first print. Also not every printer can produce parts of sufficient quality for this design. I think building one of these would be a great project for a group of high school kids. They would not only learn about sine and cosine; they would learn about the process of building and about
ReplyDeletethe design itself.
I am a high school teacher who teaches Geometry and Engineering. I love the device you have created. I just purchased a MakerBot Replicator 2X for my classroom. I have downloaded the files to make this devise. I have a couple of questions...
ReplyDelete1) It appears that I will need to scale down the device in all windows to get it to fit on the print bed of the 2X. Any suggestions on a scale?
2) The fastener file show the parts at an angle. Is that intended or do I need to rotate them to lay flat? The screws and flat pieces are not at the same angles.
3)How can I contact you for more information?
Hi, I'm glad you like it! You can contact me directly at lm.albritton@gmail.com. I don't recommend scaling the models down. Tell me your max printable area, and I will attempt to arrange the models to fit. My platform is 5.125 square, and I can print all of the parts if I use a two-piece yoke, and glue it together. I do recommend that you print some simpler models first, to get a feel for your machine. Oh, and the fasteners do print at an angle. That makes them stronger; otherwise the heads tend to shear off.
ReplyDeleteI love this model. I didn't truly understand sine and cosine until i saw this thing in action. It prompted a conversation with my wife about the inadequacy of American public school.
ReplyDelete